Friday, November 30, 2012

Decorating a girls room on a budget

My beautiful girl is growing up. It makes me sad but excited for her! She was moving into our guest room and when I was asking her how she wanted me to decorate it she said she didn't want anything babyish.  We went to Hobby Lobby and found this fun pink and black fabric and I went ahead and got a yard of it not really sure what I would do with it.  She got a big bed and a big dresser that should last her until college. And I wanted to try and decorate it cute but recycle most of her old decorations. 

First I took her old lamp that we got when she was a baby and was covered in dragonflies, and I simply covered it with the cute fabric. I rolled the shade along the fabric to cut the right shape. Next I Modge poged it on. I hot glued the fabric to the inside of the lamp shade both on the top and the bottom to make sure it would stay securely in place.  


Next we got her letters from her room that were white and covered in baby scrapbook paper and recovered it with the fabric as well. First I painted the letters black and then I simply laid the letters over the fabric and traced the size I needed and cut them out.  Then I put modge podge all over the letters laid the fabric on top and modge podged the top .  I wish I had a before picture because they look sooo different.
Next I wanted a large picture for a large wall. When this room was our guest room we had a large picture of a vintage truck on the wall. Seems odd but someone gave my husband the picture and I liked the black frame and white mat. So, I simply took the vintage picture out and modge podged the fabric right on top of it.  Next I found a print that I really liked (I found this picture as a free printable on pintrest) and had it printed as an 8x10 picture.  When it came in I modge podged it to the fabric and that was it.  Don't you love how it turned out.  I'm not sure why its hard to read in this image but it says "if this isn't your castle your not my prince."  I am so happy with it as the main art piece in the room and I love that it is church related but girly at the same time.  

As for the rest of the room we just decorated in matching colors.  I made Black and hot pink pillows for the bed and a hot pink bed spread and pillow shams. It's amazing what you can do with just 1 yard of fabulous fabric! So fun. Now she has a room that she loves now and will hopefully love for many years.

Wednesday, November 28, 2012

Make your own Christmas Decorations

I love this time of year! Decorating for Christmas is so fun and there are so many fun yet simple craft ideas.  Every year my Mom, Sisters and I get together and do a craft night. I love it! Everyone comes up with a craft and bring enough supplies for everyone to do it.

One year my sister Lindsi came up with these cute Bells.  So simple yet fun. Just tie it to a pretty cording. Add berries and a cute bow and that's it. Sometimes less is more and this is one of my favorite Christmas decorations.

 Have you seen these place mat pillows? So simple and fun.  All you do is take a place mat, make sure that the back and the front are 2 different pieces of fabric.  Then you simply un-stitch one side. I only un-stitched it big enough to fit my hand inside, and stuff it full of stuffing. Then once it is as poofy as you want it then just stitch it back up.  You can't find a cheaper pillow and how fun to be able to have throw pillows for every holiday.  You could even do These place mat pillows for everyday use. they really do turn out cute and are so simple.

These Christmas tree towels are so simple and fun. You could even add a ribbon Christmas tree to a t-shirt. All you do is cut several pieces of ribbon at different lengths and sew them on. I used a little piece of brown ribbon for a stump and a little star shaped button for the tree topper.  I also got several pieces of ribbon and gathered it and attached it to the bottom of the towel for added Cuteness. I love how it turned out and people ask me how to make these ALL the time!  So fun and simple.

Monday, November 26, 2012

DIY Necklace

 I love the idea of jewelry making. However... I've tried it and it is just not a talent that I posses. ;) I also hate paying a bunch of money on jewelry, just to have one of my girls break it the first day I wear it. That being said I was beyond thrilled when I saw these gorgeous DIY necklaces at JoAnns.  Since I've been doing it, I've also seen similar types of pieces at Hobby Lobby and even Wal-mart. So keep your eyes out when you are in the DIY jewelry or craft section at your local store.

First you pick out the main necklace piece.
 Next pick out a matching chain or just a chain that you like. And also pick out connecting pieces that you like. 
 Attach the connecter piece to the chain.
 Then attach it to your main jewelry piece.

 Easy as that! I just got 2 of the main parts and use the same chain and connector for both.  Also don't forget to use your 40% off coupons for an even better deal!  I'm so excited about my new discovery!

Wednesday, November 21, 2012

T-shirt upcycle with Fabric Paint

The girls love the sparkles. I wanted them to have a cute but basic t-shirt. I followed the same tutorial as I did on the sweatshirt upscale here.  
 
The only difference is I cut out the girls first initial and used freezer paper to iron it on.  

I also chose the girls favorite color to paint onto the shirt. Along with glitter of course.  Cute, Simple and fun!

Tuesday, November 20, 2012

Upscale: Drab to fab sweatshirt

 I got this sweatshirt for Deja because she is all about being cozy.  How ever I knew I had to fix it up because well..... that's what I do :)

I had some faux fur left over from this project,a and so I decided to add it to the hoodie.  So cute right! However I knew I wanted to do something more.  It still seemed a little to simple.

 So I decided to do something I've been wanting to do for a while. Fabric paint!! And glitter is a must right?

 I decided to go with white paint and basic silver glitter.
The first thing I did was cut out a basic heart on freezer paper and iron it on.  Freezer paper is perfect for homemade stencils. 

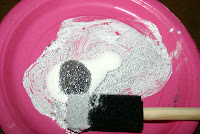
Next mix your paint with glitter and just paint it on. 


It will take a couple of hours to dry. I just let mine sit overnight.  Then simply peel off the freezer paper and throw it away.  So cute right!


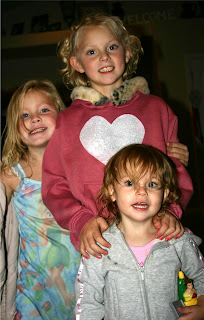
She was so excited about her new, now way girlier sweatshirt.

She cracks me up.  She is all about me taking her picture and then striking poses.


And it must of been contagious because the other girls insisted on me taking pictures of them too. Even Devyn with her super messy hair that she refuses to let me pin back out of her eyes. 


Monday, November 19, 2012

Baby Boy Onsie

 So I have never sewn for a baby boy. Funny right!  I guess that's what happens when you have 3 girls. 
My Cousin is having a baby boy and I was so excited to make these cute dressy onsies. I was looking for some fun boy fabric for ties and vests and then it dawned on me.  
I swear the tie isn't dirty it just caught a bad shadow.

Last year I made a quilt  from all of my Opas favorite shirts. He passed away a year and a half ago and I wanted my Oma to have something special to cuddle up to.   The quilt was What better then all of his favorite shirts. It was a big hit.  
When I was finished I couldn't bring myself to throw away the scraps from the shirts and I'm so glad that I kept them.  How fun for my cousins sweet baby boy to have a piece of his great Opa.  Not only that, but it was the perfect addition for a manly look :)  I simply traced the onsie on a piece of paper and sketched a vest. Then I cut it out to use as a pattern. Next I drew a tie and cut it out. Now you have your pattern.  Cut out your material and pin it to the onsie and sew.  I used a tight zig zag stitch all the way around so it would have a defined outline and would stay put.  On the vest, I wanted to add buttons to give it a finished look. With the other one I just sewed on ribbon to give it the look of suspenders. So fun to sew for a baby boy for a change. I hope she likes it!

Thursday, November 15, 2012

A little fur goes a long way

Fun collars just  make everything more fun, right? So for every project you see there is one that didn't work out quite as I had planned. I saw a picture of a cute sweatshirt here. I really liked it and wanted to try and make it for myself but I was having a hard time finding a sweatshirt that I liked. I did find an inexpensive one without a hood and thought I'd try it out for Deja.  It turned out like this.

Not the worst thing ever but far from what I had in mind.  I honestly wasn't really a fan but my daughter saw it and wouldn't let me throw it away saying she likes it because it was made with mommy love :) Seriously the sweetest kid ever. She actually wore it quite a bit but every time I saw it I was a little embarrassed.  I saw this fun tutorial on adding faux fur to a baby girl hoodie here and it seemed simple enough. So I decided to give it a try.  Just measure around were you want it and cut a strip.  its pretty messy there was faux fur every where!! 
However it was so easy. I simply pinned it on all the way around tucking half an inch or so inside the sweater and sewed it on.  I sewed along in inner edge and along the outer edge. I was a little surprised by how easy it was.  The Faux Fur is long enough you almost can't even see the stitching so its easy to cover up any mistakes. I like it soooo much better.  Now I don't have to be embarrassed to see her wear it around. She loves how soft it is so that helps too!

Wednesday, November 14, 2012

Cute Ruffle Shirt


You know that adorable ruffle fabric I showed you here?

When I first saw it I knew it had to be mine. I literally

made 8 shirts out of it HA! It so fun, and it makes a

HUGE difference in a short amount of time.  Also a

little bit goes a Loooong way. A half a yard got me 4

shirt one for me and 3 for my girls. So ya we pretty

much have all matching shirts ha ha!

All I did was take a basic t-shirt and cut along the seams

on both sides all the way up to the sleeves. Then I laid

the ruffles on top and used the t-shirt as my pattern to

cut out the ruffle fabric.  Next I pinned the

ruffles to the t-shirt paying special attention to

make sure the ruffles are all facing down and

sewed it on.  Next I pinned the t-shirt back

together and sewed along the original seams.  I did

sew across the top of the ruffle fabric and along

the bottom just to make sure it is attached

securely. 

I'm seriously obsessed how adorable is this!  Yes, I

have them for all of us in white, pink, black and soon to be yellow.  It's okay, ruffles are in..... right?


Tuesday, November 13, 2012

Square shirt

So I've been really into sheer fabric lately. Not really sure why, it's just so fun and breezy. I've been noticing lately that most of my favorite shirts are literally square shaped. All you do is cut a basic square and a half circle for the neck.  I cut two 5 inch tales in the front so I could have a tie. Then simply throw on your double hem foot if you have one and sew all the way around.  One of my favorite bloggers  at Cotton and Curls has an amazing tutorial that you could follow if you feel like you need one.  You can find it here.
You've got to love a shirt you can make from start to finish in 20 minutes!

Monday, November 12, 2012

Sparkly sleeves

Every girl needs a little bling in her life!  So the other day I was shopping and everywhere I looked in the little girl area was this sequiney material. They had it as vests, skirts, sleeves, everything!  I already have a ton of this material in almost every color so I thought I'd see what I can recreate.
So it's the beginning of November, and I usually by now am all done with Christmas shopping. Or pretty dang close to being done with it. However, Sigh.... this year I have almost nothing :(  So to say I'm a little stressed out about it is an understatement.)
A couple of weeks ago I was at Wal-mart and they were selling all there clearance stuff for $1. I grabbed a ton of basic t-shirt knowing that I could do something to spruce them up at some point. And they have been waiting in my sewing room ever since. Knowing how much my 7 year old loves the sequin look. I decided I'm going to try and recreate that style and put it away for Christmas. I decided to start with what in my opinion would be the simplest upcycle, which is the sparkle sleeve.

 Step one: Cut off the sleeves just on the inside of the existing seam

 Step 2: Use the sleeve you just cut as your pattern. Lay it on top of the material you want to use and cut it out. So you will end up with 4 sleeves total. 2 sparkly ones and the 2 that you cut off.

Step 3:  Lay the sparkly sleeve on top of the t-shirt sleeve pin all the way around and sew all the way around.  Now you will only have 2 sleeves.

Step 4:  Reattach the sleeves to the t-shirt.  with the right sides together, Pin the sleeves back on the t-shirt. Sew all the way around, and your done!


 In this one I decided to add a pocket. I simply cut out a similar shape to the tiny pocket the shirt already had, folded under the edges pinned it to the shirt and sewed it on.
Grey with purple is always fun!


Next I'm going to try and recreate the attached vest.  I'll let you know how that goes!

3 shirts ready to be wrapped up for Christmas! Makes me feel a little better :)


Thursday, November 8, 2012

Spruce up a basic onsie

The only way she was going to let me get a picture of her is if I let her take a picture of me at the same time :) She's such a silly little girl! Love Her!

One of the quickest easiest projects around is to spruce up a basic onsie. I got this Idea from ucreate you can find her link here.  She has lots of cute ideas. Lots of which I have duplicated in my own way. Unfortunately, this kid grows like a weed and the ones I've done are all now too small. I will be doing more similar things in the near future and I'll show them to you then.

Anyway, its super easy and simple. I just used felt so there is no fraying and well, felt is cheap! All you have to do if you use felt is cut out the shape you want and attach it. It holds up amazingly well. I've never had any problems with them coming off in the wash or anything, Love it! Easy and simple way to dress up a simple Onsie and if you have kids you probably have LOTS of them.  You could even sew it by hand.  You could do anything for any holiday jack o lantern, Turkey, Christmas tree, Valentines heart, shamrock, etc. What a great idea for a shower or new baby gift! The possibilities are endless.