Saturday, September 29, 2012

Brown & Pink Apron


Isn't this so cute! I wasn't going to post about another apron but I made this one for My Cousins bridal shower and thought the pink and brown were so fun and cute together. I made it the same way as I made the other apron. The only thing that is different is I added this cute pink ribbon ruffle to the bottom, on top of the other ruffle.
Pretend that you don't notice my PJ bottoms in this picture ;)

Friday, September 28, 2012

Ribbon Flower tutorial


 Aren't these little flower clips so cute! 

I looked everywhere for the perfect hair clip for our family pictures, but could never find exactly what I was looking for. So I decided to make something with the 3 colors in the girls' skirt to tie it all together.


All you do is pick out your ribbon & warm up your glue gun. You put glue on the edge of the the ribbon and bunch it to get a small mound. 

Be super careful not to burn yourself. Those glue guns get hot. Then you just twist the ribbon and wrap it around itself, adding small dots of glue as you go. 

Once you get it to the desired size, go ahead and clip the remaining ribbon.

 If you want, you can stop there, or you can keep going with more flowers to create a cluster. I attached the 3 flowers I made to a circle of felt with a dab of hot glue. I then glued on some pearls for added bling. And attached some pink feathers & netting.

I think they turned out so fun. 


To the back of the felt I attached the hair clip & I also attached a broach pin so it can be pinned to their little white sweaters or clipped in there hair.


 I did the same thing with this apron I gave as a gift. I just didn't add the hair clip. I wanted the flowers to be detachable so she wouldn't have to throw them in the wash if she needed to wash the apron. 

All of these beautiful family pictures were taken by Andrea Tuft Photography. You can check out her blog here. She's AMAZING!

Thursday, September 27, 2012

If you love it, why don't you Make it!

 I bought a cute Salmon colored shirt a while back at a boutique. I love it! It is sheer and comfy and just really nice. I'm a simple sorta girl and I love the idea of just throwing one nicer thing on and feeling a little more put together.

Since I purchased it at a boutique, it was completely hand-made by someone else. Yesterday when I was doing a little grocery shopping and wearing the shirt I thought, "If you love it why don't you marry it!" Ha ha I'm such a nerd. But that's what we always said as kids and I couldn't help myself. Ok, what I really thought was "If I love it so much, I should try and recreate it in a different color". And that's exactly what I did.  Believe it or not, it was surprisingly simple.

So I ran over to the fabric store and was shocked to find a bunch of sheer fabric in the bargain bin. My favorite place to shop!  So I grabbed a couple of yards of cream and came home to get started.

Just lay out your fabric and place the shirt you'd like to duplicate on top. make sure its laying smoothly and just trace around it and cut it out.
 In this case the shirt has a tie type thing running down the middle, so the front has 2 sections. I folded it in half and laid it on the fabric, making sure that the fabric was also in half, then I started cutting it out. Don't forget to cut a separate piece for the back and to cut out all the add-ins that your shirt has. In this case I cut out 2 rectangles for pockets and a long rectangle that I folded over and added interfacing to to make it stiffer for a collar.
 Once you have all the pieces cut out pin them together and sew them up. For this shirt, I sewed the front to the back and then folded over the 2 front pieces and sewed them creating the tie type thing.  Then I sewed them together so the front is just one piece.

 After that I just folded the sleeves up for the "folded sleeve" look. I added the pockets and collar, and I hemmed the bottom, and that's it.  I also love that it's cream so it will take on the color of whatever shirt I wear underneath. Fabulous! Wouldn't it be so fun in a striped or polka dot fabric? I'll be keeping my eye out.

  
Don't be afraid to sew without a pattern. Some of my favorite pieces are things I've seen and tried to recreate my own way. Haven't you ever seen something at the store and thought "that's so cute but it would be cuter without ________".  Or "it would be cuter with  __________" . Trust yourself and try it. You'd be surprised how easy it can really be.


Tuesday, September 25, 2012

pre-smocked fabric sundress

Have you seen the pre-smocked fabric at the fabric store? Isn't it fun?!

It can be a little pricy. However, if you can get it with a coupon or on a good sale, it is still cheaper than buying a dress.

I measured around my girls chest and realized they only need 1/2 a yard for 1 dress, so I was able to justify spending the money.

I found this cute yellow fabric on sale for $7 dollars a yard. So I thought for $3.50 per dress that was a fabulous deal.

All you do is measure around your little girl's chest. Make sure the smocked part of the material is the same width, add an inch for comfort. Then just sew the 2 raw edges together all the way down the length of the dress. On my girls the material was plenty long, but you may want to measure against your little one to make sure the length works. I added some ribbon for straps, and that's it! It comes already hemed & everything, so it couldn't be simpler. But it makes a fast, cheap, cute, semi-homemade summer dress. What more could you ask for?

Monday, September 24, 2012

Taking in Men's shorts

My husband Kelly has recently lost some weight & some of his favorite shorts no longer fit. So he asked me to take them in. I made him pose for the camera first. Lol I'm so sneaky.

To be honest, this kind of stuff is what I do on the sewing machine the majority of the time. I thought I might as well document it & let you know what I do.

Now to say that Kelly is extremely picky about things is an understatement. So I'm always a little nervous doing adjustments for him.

But throwing out your favorite shorts because you've lost some weight seems ridiculous to me.

So all I do is have him put them on inside out & I measure how much he wants me to take in. I carefully pin each side so they are even & sew down 5 or 6 inches slowly tapering out so it's not noticeable. It's kind of hard to see in the picture, but if you look closely you can see where I stitched.

He used to pay the seamstress from The Buckle big bucks to alter his jeans. I thought duh, I could totally do that! So I studied what she did & copied it. Honestly, it's super duper easy.

Just be careful you sew along the seam & don't accidentally sew the pocket closed. Easy as that. It only took about 10 minutes.

I think he is looking good! Love you babe :) thanks for letting me embarrass you in this post!

Sunday, September 23, 2012

Semi-homemade princess dress

So I'm still getting used to this blogging thing, and I am terrible about remembering to take before pictures. But if you can imagine this dress was very well-loved. The hem had long since fallen out, and the bottom of the dress was shredded and strings where everywhere. Not only that, but the sleeve had ripped completely off, taking the very Aurora collar with it.

Now just to get it out of my system- I have to say WHY would they make a dress up dress out of this very thin mesh-like material and not expect it to rip apart in the first couple of uses!? Who ever created it must not have daughters who LOVE dress up. I'm just sayin'.

This adorable thing insisted on being Aurora for Halloween and INSISTED that it be a home-sewn dress, not a store-bought dress. I have a ton of big sewing projects this next month (the biggest being cutting up a mother's wedding dress to create a daughter's baptism dress), so I am trying to get Halloween stuff all done so I can focus 100% on the upcoming projects. First, I just found a yard of matching satin fabric and tried to cuten it up.
I grabbed a pattern that I had with sleeves and used just the sleeve pattern to cut them out. She insisted Aurora has long sleeves and it has to be exact, apparently.  The collar was a bit tricky. I looked at lots of pictures of Aurora to try and get it just right. I cut out 2 exact pieces and added interfacing to make it stiff so it would stand up like it's supposed to.


Next, Kambria insisted that Aurora has a floor length dress and I wasn't sure it would look great if I added to much fabric. But I added about 6 inches to the bottom and hemmed it to make it a little longer, and she seemed happy about that. She said it makes it spin just right.

You can't be a princess without a crown, and Aurora has a rather large one. I picked up this pattern a while back when Hobbby Lobby was having their .99 pattern sale and I knew it would get used. I simply cut out the pink crown, added interfacing and elastic to the back, and voila- a cute crown to top off the outfit. She loves it and looks adorable. And I'm happy I was able to get away with fixing up an old dress rather than making a new one from scratch!


Saturday, September 22, 2012

Cute yet Functional Apron


I have a pampered chef apron that I absolutely love. It's not the cutest thing I've ever seen- not ugly, just sort of plain Jane. I love that it has an adjustable neck so I can make it as tight or lose as I'd like, and it's really wide on the sides so it covers everything really well. Honestly- what more could you ask for from an apron?! It is there just to protect your clothes right?


Well I'm sure you've seen the super popular flirty apron. WAY cute! I saw a kiosk for them at the mall and although they were super cute, I couldn't help but think if I got it I would most likely revert back to my trusty yet rather boring pampered chef apron for no other reason than it would cover me more & would probably keep me cleaner. Then it dawned on me. "you're a sewer. Doi!" Recreate the pampered chef apron with cute material & add ruffles, flowers, pearls or whatever cutsy thing I wanted to create the best of both worlds.


First things first. Pick out some adorable yet heavy duty fabric.You'll need about a yard and a half.  I chose to go with Duck fabric because it felt thick and apron-esque, if that's a word. I just checked- yup, it's a word. I thought this fabric material seemed cute and girly and the colors were perfect for the person I was making it for.


Layout your favorite apron on top and just cut around it, allowing an inch and a half for rolled hemming.  And just cut it out. That's how I roll. I could make it more complicated but I simply cut around it. If you feel more comfortable tracing it and then cutting it out, go for it!

Cut a 12 inch by 9 inch rectangle for a pocket if you want it. I wanted to add a ruffle to the bottom, but had a largish rectangle instead of a long strip so I just cut 3 strips that I'll stitch together and ruffle at the bottom for extra cuteness. And that small pile in the corner is all the fabric I had left.

I then fold over just a little, maybe a quarter of an inch & iron.

Then fold over again, so you have about an inch, and iron & pin. You're only going to do this to the top, bottom & sides.


Then if you have to, do what I have to do. Give that adorable munchkin some lunch and take her picture so she doesn't feel jealous of the sewing.


Your going to leave the arm pit areas alone for now. Sew all the areas you've pinned along the inner edge.


 Once you've done that & sewn it all along the inner edge your ready for the armpit area which is where you are going to add your ribbon so it needs to be a little thicker. I did the same thing- turned it under 1/4 of an inch and iron, then turn it over about and inch and a half and sew. DO NOT sew along the top or bottom. remember you are going to thread a ribbon through it, and need it open so you can do that.

Now your basic apron is done. This is the time to cute it up a little. I turned my pocket in 1/4 of an inch and ironed (are you feeling the theme here?) and about an inch on the top. Measure the apron and find the middle or just eyeball it and pin it. Sew along both sides and the bottom. I sewed a line down the middle to make it have 2 sections.
For whatever reason, I completly forgot to add pictures of creating the ruffle. I sewed my 3 strips together to make one long strip. Hem both sides and the bottom. On the top you're just going to do a basting stitch and pull the thread, being super carful not to break the thread. Adjust the ruffle until you feel it's even. Then pin it to the right side of the apron and simply sew all the way across.

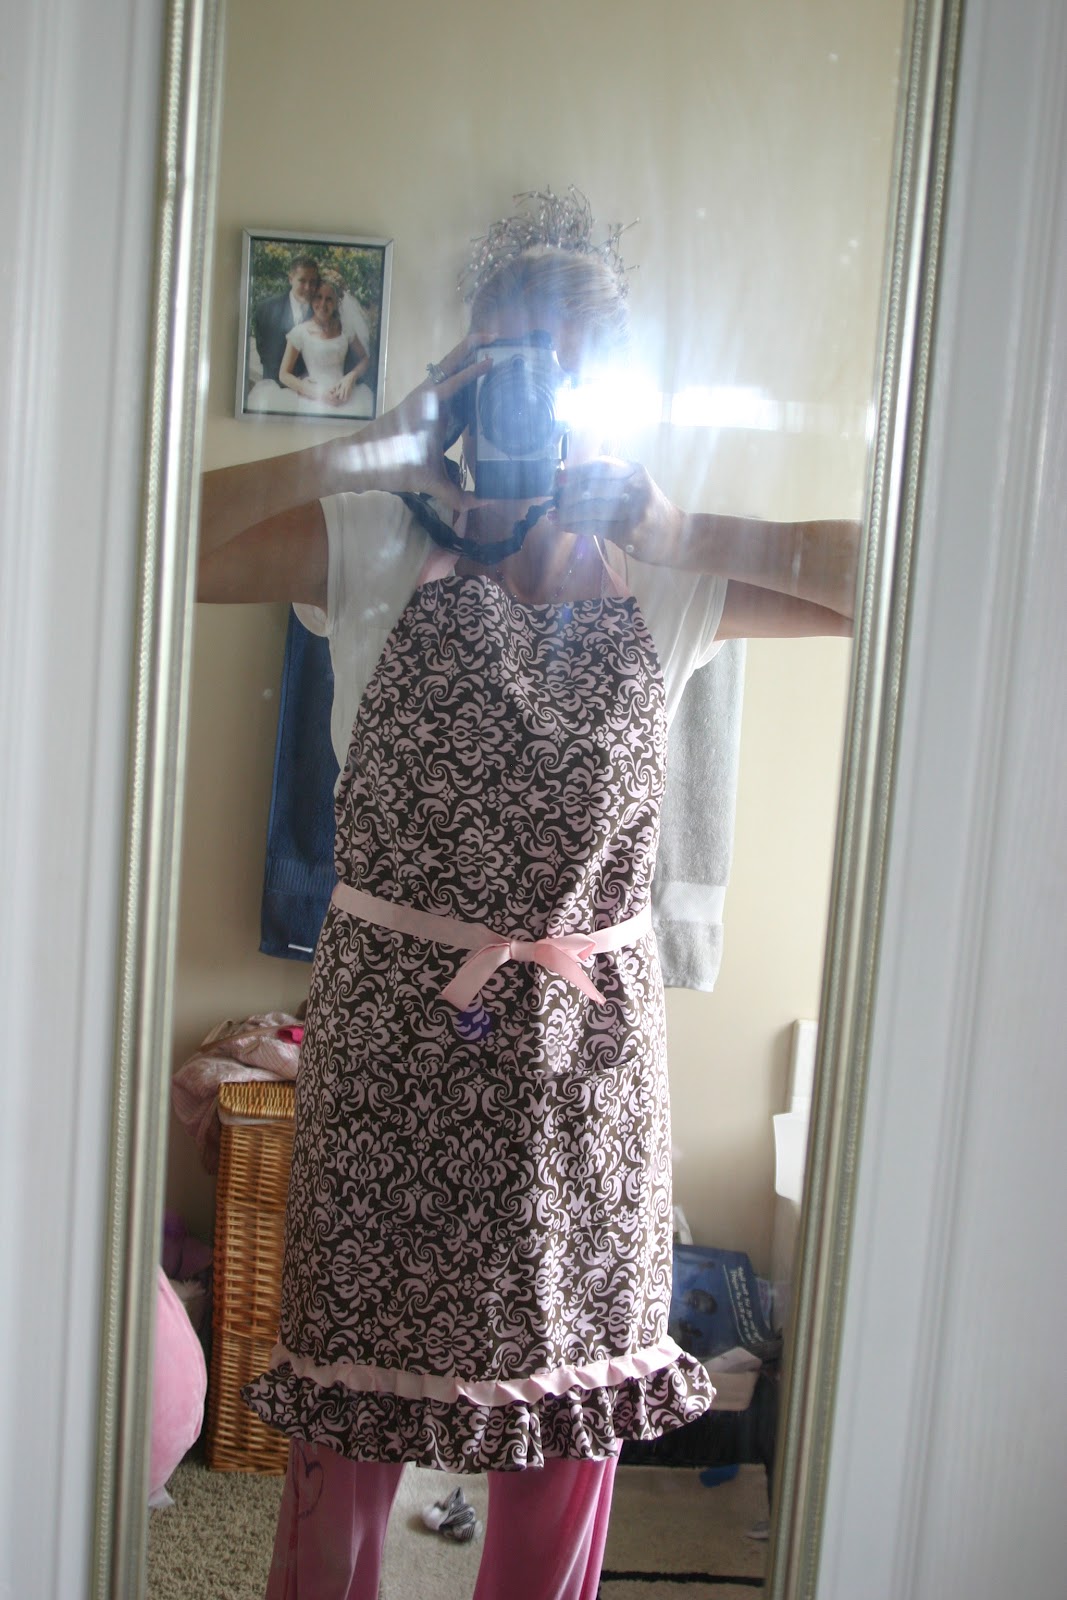
So cute, right?! Then you just thread your ribbon through ( I used about 3 yards of ribbon but I like a looong tie) and voila! A Gorgeous yet very functional apron you will Love and look adorable in!


Of course I forgot to take a picture of the final project on before I gave it away but here is a picture of another one I did the exact same way! On this one I added some detachable flowers for added cuteness. 
I hope you enjoyed this tutorial and I hope you make one for yourself and send me pictures!